Friday, June 3, 2011 2 comments

The Breakfast Nook (A Before and After Story)

Hi there and happy Friday!  I don't know about you but I'm ready for another weekend already.  Things have been busy around here and summer is in full swing.  Thanks for all of the postive feedback from my Living Room  Before and After.  I thought since you got to see the picture of the area that we now call the Breakfast Nook in the Before Picture, it's only fair to show it to you after.  When we first looked at this house 6 years ago, it was empty so I don't know what this space was used for originally.  A neighbor of mine said that at one time they used it as an office.  To me, it was screaming for a built in booth and table.  This is just off the Living Room and Kitchen so it's the perfect place for the kids to do homework and for all of us to talk when I'm in the kitchen.  This is a rather large space so it was going to be something we had to build.  We decided that if we were going to build seating all around, we should include storage underneath.  We don't store anything in there really but we did decide that we could put all of our TV equipment in there and wire it up to the TV.   The end result is a large space for casual eating and a storage solution for the entertainment center.  Ready to see it?  Let me show you the before first...


Deja Vu right?   I am happy to report that the dog bed has been relocated to a more appropriate place.  Now, let's see the after ......

 
Here it is. This seating area accomodates up to 12 people (if you pull up some chairs ) and we think it's the best seat in the house. The windows overlook the backyard. This shot was taken in the morning and some below were taken in the late afternoon. There is always pretty light in this space. Here's some more pictures.


The brick is actually the fireplace.  It's just to the left.  I like the rustic element of the brick so I elected to not put anything on the wall.  The table base we bought at Sears of all places. We were able to purchase it without the top (the people at Sears thought we were crazy). The table top and all of the benches were built by my HH (Handy Husband).  The chandelier is vintage from Buenos Aires. I bought it at the Urban Market in Houston.
 
 
 I don't know if you can see it clearly but there are vintage metal heater grates on the front of the benches. These are framed in to make little doors that pull open. The cable box, DVD player and receiver are all hooked up in there.   
 
 
The centerpiece on this table is an old grocery scale with some of my favorite candle holders on it.  The scale is perfectly distressed and really heavy and I like it displayed this way. 
 

This is a different angle if you're sitting at the table looking into the kitchen ( I'll show more on that later....).  This has been one of the best things that we've added to this house and it's our "central hub".  What do you think?  Where do you and your family gather the most in your house?
Wednesday, June 1, 2011 2 comments

Back when......(A Before and After Story)

We've been in our house for 6 years now and although it is still a "work in progress" we've come far in making this house our home.  I thought I would share a couple pictures of the before and afters on our house so you can see the work that has been completed so far. It's funny to look back at these pictures because it seems like a long time ago.  Then I remember the sheetrock, the dust, the texturing, the painting, more painting and all of the other inconveniences that go along with remodeling and it seems like yesterday. Wait a minute, that was yesterday....... Anyway, it's all worth it in the end and there's great satisfaction in knowing that you did it all yourself.  The drawback?  When you keep moving forward and forget to stop and look back at how far you've come and enjoy the progress.  Here's the first stop.......The Living Room.....


Let me just say that if you are into that "Tuscan" look, you would've loved this room.  For me, not so much.  I will give credit to the previous owner who actually did a great job at making those bricks look real. They even felt rough like bricks.  I have total respect for the effort that went into achieving this look, it's just not the look I want. After attempting to sand this finish off to no avail, we decided to re-sheetrock the entire room and adjacent hallway.  Major mess and a lot of work but it was the only way.  Do you see that space in the upper corner with the window and the dog bed?  Well, that is our breakfast area now (picture to come) and just past that is the kitchen.  Here's another angle of the same room..


This angle shows you a different side of the room.  In the upper left corner, there's the staircase that goes upstairs and then the door that goes to the Master Bedroom and Bathroom.  The large windows look out over the backyard and when you come in the front door, you can see right through those windows to the backyard.  I've been thinking of putting in french doors there but there are several doors that already go to the backyard so I don't know if it would be overkill or if I'd even go outside from there.  So basically, I'm still thinking about it. Now, let's take a look at the stairs.

 
Isn't she cute?  This is my daughter Gabriella. How time flies, she's 11 now!  Ahhh! Anyway, back to the stairs.  Nothing special here except that there's carpet on them which has to go.  The wall color and the light are going and we did a little something with the wall (see after picture).  If you look past the stairs, you will see the entryway and front door (which is also fauxed) and then the formal living room with windows that look out to the front yard.  I know it's hard to picture the front room, but basically it's the same finish everywhere with two large windows.  There's also an opening that goes into the Dining Room from there that we made some changes to as well (see after picture).    I think you get the idea of what we were dealing with here.  Ready to see it now?


A different angle than the before pictures but I wanted to show you the formal living room which is now the library.  Where there was once just wall, my HH (Handy Husband) built wonderful bookcases that frame the front windows.  This also anchors the room and gives it a purpose instead of it just being a space with furnishings.  The French Doors we installed (before there was just a really big opening to the Dining Room).  The French Doors came out of an old house that was being demolished so they were free.  Although this did require a lot of work to get the doors prepped for paint, it is so worth it to me.  It adds that touch of character that I love.  We also put in recessed lights.  Let's see more.........


This picture is in a previous post of mine but it shows this side of the room well.  The entry way is the same as before with the exception of the new sheetrock and front door being painted.  There is crown molding and baseboards with corner blocks along every wall in this room as well.  The color on the walls is "Hot Spring Stones" by Benjamin Moore. Not pictured is the fireplace.  Obviously we kept it but we got rid of the brass screen and my husband built a mantle surround.  I'll picture that in a later post.  Now for the stairs.......


Well, no carpet.  Yeah!  The good thing is that these are wood stairs.  Problem comes in when you have kids and dogs that run up and down them all day.  This means that your pretty white stairs wind up always looking dirty and scratched.  Not the end of the world because hey it's still better than carpet.  I'm considering a runner for the stairs but to be honest, I'll probably just re-paint them until I decide. Another thing to point out.  We cut a hole in the wall and created the doorway that you see going into the office.  Before, the office seemed like it was a dark cave that was shut off from the rest of the living room. You could only get to it by going to the hallway at the front of the house, past the guest room and guest bathroom.  Now, there's a good flow to this side of the house and the office gets more natural light from the windows.  The French Door is from the same house that the Dining Room doors came from.


I will say that white floors do require maintenance, but in it's defense this is high traffic so in reality these have stood up better than the berber carpet that was there.  Plus, they're easy to clean. The color on this wall is "Pismo Dunes" by Benjamin Moore.

 
Just in case you missed it, I love old frames and it's clear that I am way behind on my photo taking.  Actually, I like to look at the frames whether or not anything is them and I think this is a great space to display them.  My goal is to actually fill the frames with photos so I guess I need to get snapping. 

Well, that's the Living Room before and after.  Hope you enjoyed the tour. I have some more before and afters of other rooms that I'll put together soon. What about you? What's been your biggest project?
Sunday, May 29, 2011 0 comments

Frozen Sweet Treat

It's been in the 90's here for the past several weeks and it definitely feels like summer.  Not unusual for south Texas, but it puts you in the mood for cold drinks and anything frozen. I like to make this pie when it's hot because it's such a nice change from ice cream or Popsicles.  This is really easy to make and tastes very refreshing.  I originally got this recipe from an issue of Southern Living Magazine but I wrote it on a index card so I'm not sure what issue it was.  Anyway, it tastes great and is so easy, you can make one for yourself and one to take to a neighbor or to your next summer party.  I'd love to know what you think if you make it.  Enjoy. 


Frozen Raspberry-Lemonade Pie

1 14oz. can sweetened condensed milk
1 6oz. can frozen lemonade concentrate, partially thawed
3 TBSP. seedless raspberry preserves ( I have also substituted this with Marionberry Preserves and it's what I used in the pie pictured)
1 8oz. container frozen whipped topping
1 6oz. ready made graham cracker crust ( I've also used the Heartland Granola crust which is the one I used in the pie pictured)
Garnish: Fresh Berries and Mint.

Directions:.
Whisk together first 3 ingredients in a large bowl until smooth.  Fold in whipped topping.  Pour into crust.  Freeze 4 hours.  Garnish with fresh berries and a sprig of mint (optional).  Enjoy.
Thursday, May 19, 2011 0 comments

Shell Love.......

It's so amazing to me that the ocean provides so much beauty that we never see. I grew up close to the beach and I live close to the beach now and whenever I go, I look for shells.  I also look for anything interesting that has been shaped and softened by the ocean.  Driftwood, sea glass, and even coins.  I like to disaplay the shells that my family and I collect when we go and I also have some shells that I've picked up at thrift stores.  In addition, I have quite a few large shells given to me by my 95 year old grandma who used to throw some crazy good theme parties back in the day, one of which was the "Luau" party.  My love for shell decor doesn't just stop at shells from the beach.  Chandeliers, sconces and of course the shell motif (cocquillage) on Baroque furniture are all favorites of mine.    Since the weather is warming up and summer is around the corner, I thought I would display my shells in a different way.  My mantle has a very limited area to decorate due to the fact that we have our TV mounted on the wall above.  Although I would love to have a giant mirror in place of the TV and be able to stack candles and art on my mantle, it's just not possible.  Believe me, I've tried.  I've compromised on this because it really is the best place for the TV and so I work around it.  Here are some pictures of my shell display and some shell inspired pieces to bring a touch of natures' decor into your space.


And now, some shell inspiration......
 
Simple and beautiful seashell sconce from Oly Studio.
 
 
Love the glow this capiz chandelier from Oly Studio has. Wouldn't this be pretty hanging outside over a long table with lots of candles?
 
This is my favorite.  A definite statement piece. From Oly Studio.


Sea Fan Bottles from Williams Sonoma Home. 
 
 
I love this room and the modern stripes on the baroque headboard.  (photo credit: unknown)


This is a faux clamshell made from a mold of a real clam shell at a very affordable price at $69.99 from Treasure Gurus.
 
 
Showing some Etsy love.  Great vintage Victorian Seashell tin for $28 at GoodNorth.


Monday, May 16, 2011 0 comments

Monday Motivation.....

May you start your week with the optimism that you can accomplish great things.  May you learn something new and share a smile with a stranger.  May you find peace with the beauty that surrounds you.  May you have the courage to do what you love.  Be bold and begin it.  May you always remember to give thanks and help others when you can.  May your week be full of laughter, love and peace.

Friday, May 6, 2011 0 comments

Menu: Mushroom and Spinach Ravioli with Bacon

I'm not a big fan of spinach but ever since I had spinach with bacon, I converted.   This is realtively quick to make because there's not a lot of prep involved.  Even my kids (okay, just one of them) like this.  If you decide to try it, let me know what you think.  Buon Appetito!


Here's what you'll need:
2lb. bag of frozen large or jumbo cheese ravioli
1 10z. package baby bella mushrooms (the ones I buy are pre-cleaned and sliced)
4 cups fresh spinach leaves
1shallot (I used half of the one in the picture)
1 1/3 cup chicken broth
1/2 cup white wine
2 TBSP Extra Virgin Olive Oil
4 TBSP Butter
4 slices crumbled cooked bacon 
1/2 cup Heavy Whipping Cream
4tsp. Salt Free Italian Seasoning (I use Penzeys Spices Tuscan Sunset)
Freshly grated Parmigiano Reggiano
Chopped fresh Italian flat leaf parsley for garnish


Mince the shallot. Cut the stems off the spinach, rinse and set aside. Start to boil the water for the ravioli.
In a large pan, heat the olive oil.  Put the minced shallots in the pan and heat until tender.  Add the mushrooms and 2TBSP butter , 2tsp. Italian Seasoning (Salt Free) and  cook until mushrooms are starting to get tender (about 2-3 minutes).   Add 1/2 cup of the chicken broth and let simmer for 2 minutes.  Add 1/2 cup white wine and let reduce for 1-2 minutes. When the water is ready for the ravioli, add 1/2 cup of the chicken broth and cook ravioli according to directions.  While raviloi is cooking, add the spinach to the pan and let it shrink down.  Add the remaining 2tsp . Italian seasoning and the remaining chicken broth.  Let this simmer for 3-4 minutes.  Add half of the crumbled bacon, remaining 2TBSP butter and 1/2 cup heavy whipping cream.  Stir until the butter is melted and the heavy cream is incorporated.  Drain the ravioli and put in serving bowl.  Pour the sauce over the ravioli and stir.  Add remaining crumbled bacon, freshly grated Parmigiano Reggiano (to taste), fresh chopped parsley and serve.  Enjoy.

Wednesday, May 4, 2011 0 comments

Chic Sheds.......

I decided last weekend not to work on any projects around the house but instead take myself to several home and garden tours.  I love these for the simlpe fact of seeing where other people live.  Even if it's not my particular aesthetic, I can appreciate all of the hard work and passion that goes into it.  The first tour was close and included homes in my area.  This tour was gardens only and did not include the inside of the homes. One of the homes on the tour was modest in nature but the backyard was particularly unique.  The man that lived there had built a tree house (respecting the tree of course) and also built this great greenhouse that really surprised me.  There was a lot of detail and charm put into this space and although the couple that lives here uses it primarily for plants, I thought it would make a perfect little quiet space for reading or relaxing.  It's the smallness of this little house that I like.  With the glass roof panels, I can imagine myself in there on a rainy day listening to the rain on the glass ceiling and catching up on my reading.  I guess it would be my grown up version of a playhouse.  Here are some pictures of the greenhouse that inspired me. 


The entrance.  Welcome to the greenhouse.


Love this chandelier in here.  I'll bet this looks so pretty at night.


Even though this is space is small, the height of the ceiling and the glass panels makes this space feel larger.  The light in here is so wonderful.


Here's a side view of the greenhouse.  The treehouse is just above it.  Two totally different architectural styles but it works.  It's a his and hers playhouse. 


Here's a look at the inside of the treehouse.  The door leads out to a little balcony.

 
The view from the treehouse balcony.  The bottle tree was made by the homeowners too. 

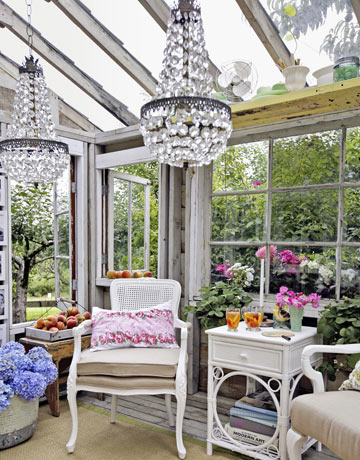
Below is another beautiful greenhouse turned glam getaway.  This is actually from my personal inspiration files.  This came out of Country Living Magazine from 2009.


It is very modest looking and blends in nicely with the garden.  Wait until you see the inside.


So, are you inspired? These little houses are so charming and intimate. I'm definitely keeping this on my want list.  Here are some books worth checking out if you want to see more. 
 

Available from Amazon.
 

Available from Amazon.


;